Get Learned! Step 3 - Buildin' BlocksBRUSHES
You should have Hammer open, so now select
File->New from the menu bar. You should now see 4 big black rectangles, or
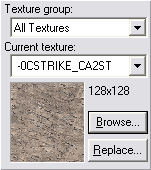
viewports, labelled camera, top, front and side. To the right, you should see a panel that looks like this:

That panel shows what texture is currently selected. A
texture is a picture that is plastered onto a wall, floor, ceiling, or
surface in a 3d game. You've probably seen them before. You can choose a new texture by clicking the Browse button. It will display a list of all the textures you have loaded right now. (Remember opening the file 'halflife.wad'? That's where these textures came from.)
Once you have selected a texture that makes your heart filled with gladness, click the button on the left that looks like this:

This is the
brush creation tool. A
brush is a 3d chunk of space defined by a few surfaces. For example, a cube is defined by 6 surfaces or planes. Move your mouse pointer over the viewport labelled 'top'. It should look like a plus with a fuzzy rectangle. Now
click and drag on the grid in the top viewport to draw a rectangle. When you let go of the drag, the rectangle should turn white and 8 little white
handles should appear around it. You can use the handles to resize your rectangle.
KEY POINT: Look at the other viewpoints. Your rectangle is actually a 3d box! Isn't that rad? What you need to get used to is looking at a 3d object from different 2d views. If you can master that, you'll be able to create just about anything you like!
Now notice that you can resize your box in all 3 viewports. This may not seem important now, but when you are building a complex shape later, this is super-duper useful. Also try
clicking inside your box and dragging it. This is how you move it around.
Now hit
Enter on your keyboard. Your box should have turned blue or green, meaning it
actually exists now. Before it was just a plan. You can
click on your box, or brush, like I said earlier, and it will turn red. In Hammer, when something is red, that means it is
selected. You can resize and move selected brushes just like you did before.
Now glue on your wings because it's time to get to the next page, Sally!
Next page >><< Previous page

